Conair HC7575LIC - Cordless Hair Clipper Manual

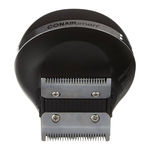
The hair clipper is perfect for maintaining a short even length all over. It has been designed with a unique cutting system and comb guides to give a guaranteed even finish. Because of this revolutionary technology the cutting technique differs somewhat to that of a normal clipper, in fact this cutting technique is much simpler!
OPERATION
CHARGING INSTRUCTIONS
Even Cut is very easy to use, however it is essential that you fully charge the unit for 3 hours before it's first use. This initial supercharge ensures optimum power performance to give smooth fast cutting every time. Maximum battery capacity will only be reached after 3 charging/discharging cycles. A full charge will provide approximately 60 minutes use. A 30 minute quick charge will provide approximately 15 minutes use.
- Before using for the first time, the appliance should be fully charged continuously for 3 hours. Maximum battery capacity will only be reached after 3 charging and discharging cycles.
- Ensure the appliance is switched off.
- Insert the small plug on the charging adaptor into the socket on the back of the appliance.
- Plug the charging unit into a suitable mains socket.
- The red charging indicator light on the power handle will flash when the appliance is correctly connected to the mains. When it is fully charged, indicator light will remain on.
- A full charge will supply enough power for approximately 60 minutes of cordless use.
- A quick charge of 30 minutes will give 15 minutes use.
- When the trimmer is about to run out of energy, the charging indicator will flash to indicate that there is less than 15% battery capacity remaining.
If the charging light suddenly starts to flash rapidly, the appliance is faulty. If this does happen, please stop charging and remove the adapter from the power source and contact our Customer Care Centre for further advice.
OILING INSTRUCTIONS
It is highly recommended before each use to oil the blades with the oil provided. This ensures optimum cutting performance. For the first use you will need to use the oil supplied with the product, unscrew the cap and cut off the very end of the plastic tube with a pair of scissors to release the oil.
To oil the blades ensure the unit is switched on. Gently squeeze the oil tube and apply 2 drops of oil onto each of the blades. Leave the unit on for a further few seconds to allow the oil to thoroughly spread around the length of the blades. Switch off the unit and remove any excess oil by gently dabbing with a cloth.
Preserving the batteries - In order to maintain the optimum capacity of the rechargeable batteries, the appliance has to be fully discharged and then recharged for 3 hours every 6 months approximately.
COMB GUIDES
This appliance is supplied with 1 adjustable comb guide that provides 4 cutting lengths from grades 1-4.
If you desire a grade 0 cut, the clipper can be used without a comb guide for an ultra close, even cut.
| CUTTING LENGTH | GRADE |
| 1/8 in. | #1 |
| 1/4 in. | #2 |
| 3/8 in. | #3 |
| 1/2 in. | #4 |
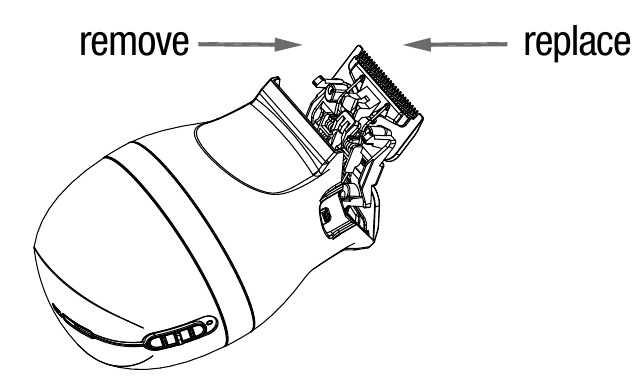
CARE OF YOUR CLIPPERS DETACHABLE BLADE SET
your cliper is equipped with a detachable blade set for routine maintenance, cleaning and replacement.
To remove the blade: The front of the clipper should be facing you; push up under the blade with your thumb and the blade will pop out.
To replace the blade: insert the bottom side of the blade into the clipper and push down until it snaps into place.
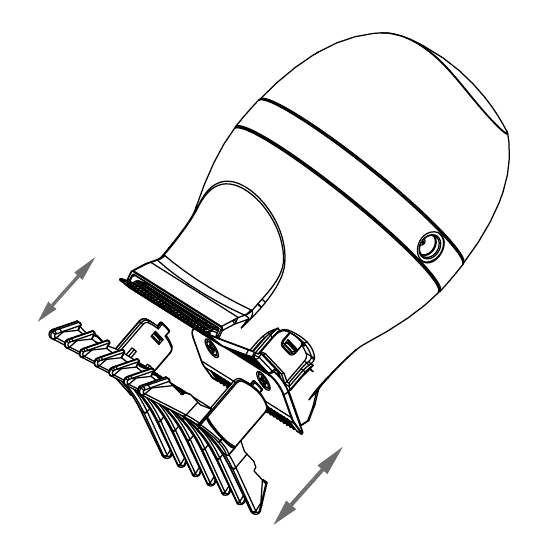
ATTACHING A COMB GUIDE
To attach a comb guide, ensure the appliance is switched off. Position the comb guide over the blades and slide the sides into the slots either side of the blades until it clicks.
To remove the comb guide, place your fingers each side of the of the comb guide and gently pull down and away from the unit.
The appliance is also supplied with a left and right ear taper guide. This can be used above the ear to get a clean line.
PREPARATION FOR USE
- Always inspect the appliance for noticeable signs of damage. Do not use if damaged.
- Always inspect the appliance before use to ensure the clipper blades are free from hair, debris etc. (see Cleaning & Maintenance of clipper).
- Prior to use always inspect the head for warts, moles, spots and broken skin. If using the clipper on yourself either use mirrors or ask another person to check for you. Special care should be taken when cutting hair in areas that have warts, moles, spots or broken skin, to prevent injury.
- Remove any head jewelry such as earrings and necklaces before use.
- For best performance use on clean, dry hair that has been combed until tangle-free.
- Ensure the appliance is sufficiently charged.
The clipper is for use only on the head. Never use the clipper on the face or any other area of the body.
CLIPPING
- Attach the comb guide length of your choice. Grade 1 = 3mm, Grade 2 = 6mm, Grade 3 = 9.5mm, Grade 4 = 13 mm.
- Switch on the clipper using the on/off sliding switch located on top of the clipper and the blades will start to move and the green LED will illuminate.
- Starting at the nape of the neck, hold the clipper with the teeth of the clipper pointing upwards and the comb guide is flat on the head. Slowly move the clipper upwards, through the hair, and towards the front of the head in a forward sweeping motion. Once at the front of the head, engage the opposite blade in a backward sweeping motion to move from the front of the head, back to the nape of the neck, see Fig. 1.

- Continue with this sweeping motion, running from the nape of the neck to the front of the head until you reach an even length all over.
- To tidy longer hairs around the ears and neckline, simply remove the comb guide and use the blade for neatening edges and shaping sideburns, see Fig. 2.

- Only apply gentle pressure.
Never force the clipper – if resistance is experienced lift clipper away from the head, empty hair from the clipper and resume clipping.
- If using on areas where there are folds of skin, ensure the skin is stretched taught prior to cutting hair in this area.
- If you experience any discomfort stop using immediately.
- If you require a grade 0 cut, the clipper can be used without a comb guide attached.
Please Note: When you first being cutting your hair, you may notice that some hair is being cut, while others are left long. This is perfectly normal, especially if cutting slightly longer hair because hair grows in many different directions. Continue cutting in a back and forth sweeping motion until all the hair is cut to an even length.
- If using on areas where there are folds of skin, ensure the skin is stretched taught prior to cutting hair in this area.
- If you experience any discomfort stop using immediately.
- If you require a grade 0 cut, the clipper can be used without a comb guide attached for an ultra close, even cut.
CLEANING & MAINTENANCE OF CLIPPER
To maintain optimum performance, the appliance should be cleaned after each use:
- Remove the comb guide after use. Rinse the comb guide under running water and dry thoroughly before storage or use.
- Never place the clipper under running water.
- After each use ensure hair is emptied from the blade area and use the cleaning brush to clean thoroughly.
- It is highly recommended to apply a small amount of oil (provided) to the blades before each use.
- Wipe the outside with a damp cloth and dry thoroughly before use or storage.
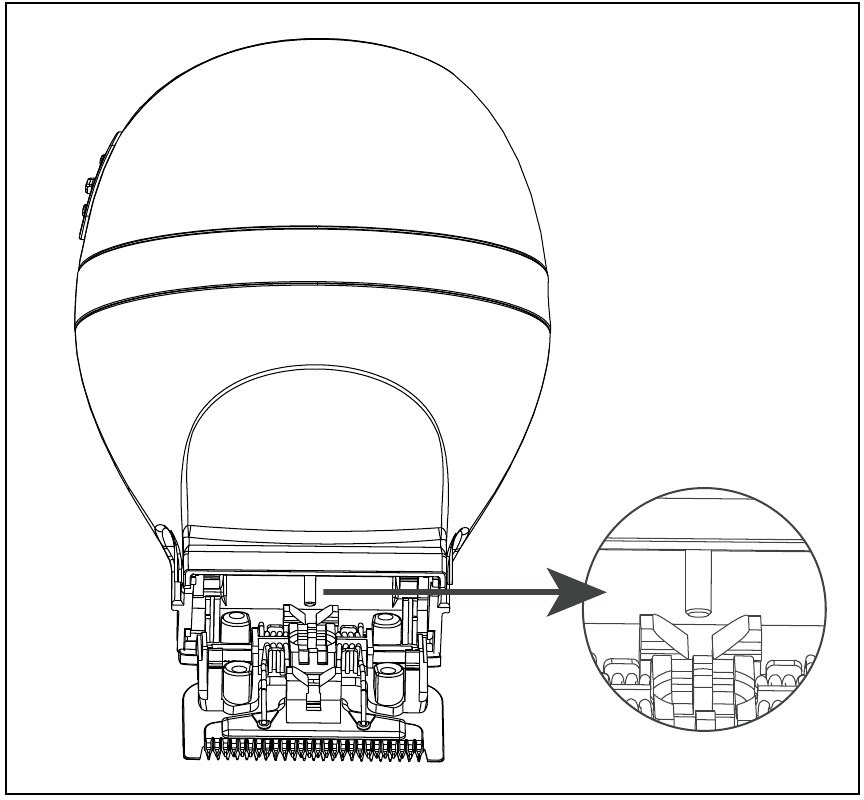
NOTE: Make sure the motor spindle is in the actuator arm after reassemble the head, see Fig. 3.
STORAGE
When not in use, allow clipper to cool and store in a safe, dry location and out of the reach of children. Never pull, twist or wrap the cord around the clipper.
REMOVING THE BATTERY
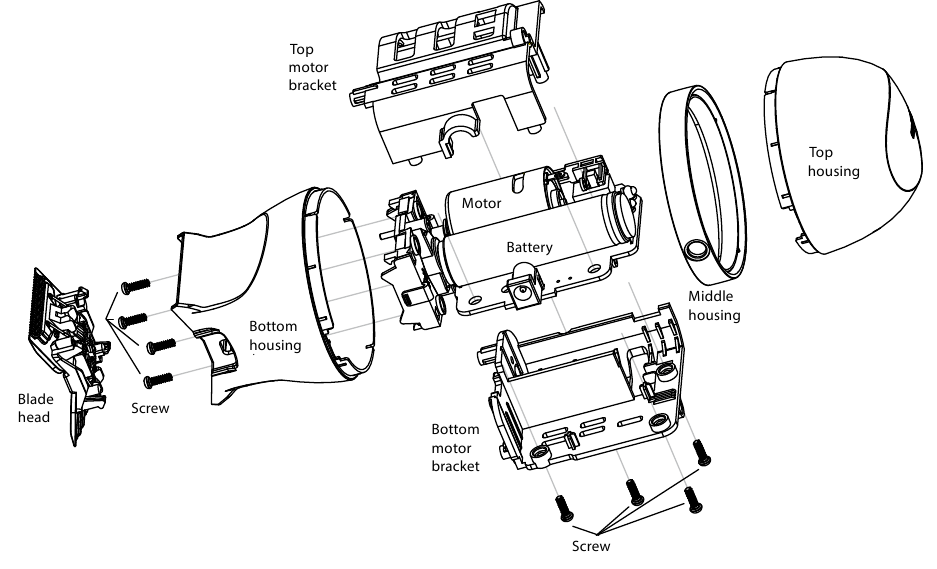
- Remove the blade set by for clipper.
- Using a small Phillips screwdriver, remove the screws on the bottom housing at back of the clipper
- Remove the bottom housing by hand.
- Using a small Phillips screwdrive, remove the screws on the motor bracket.
- Now the battery is exposed so you can separate the wire connectors.carefully hold the wires on each side ok the connector and gently cut the wires. The connector will separate and the batteries can be removed for inner housing. Bring the battery to the nearest collection center for disposal or call the toll-free RBRC information line at 1-800-8- BATTERY.RBRC is a trademark of the
What's in the box

- Cleaning brush
- Oil
- 5 comb guides (3 mm, 6 mm, 9 mm, 13 mm, ear comb
- Cordless Clipper

Documents / Resources
Download manual
Here you can download full pdf version of manual, it may contain additional safety instructions, warranty information, FCC rules, etc.
Need Assistance?
Do you have a question about the HC7575LIC that isn't answered in the manual? Leave your question here.
Thank you! Your question has been received!


